Interactive DeviceDeal storage guide

What Is RAID? Levels, Usable Capacity & NAS Setup

Learn how RAID combines drives, compare RAID 0, 1, 5, 6 and 10, estimate usable storage, and follow a safer vendor-neutral setup and recovery workflow.

RAID is not backupKeep a separate recoverable copy
Smallest drive sets capacityFor conventional mixed-size arrays
Support varies by NASCheck the exact model and software
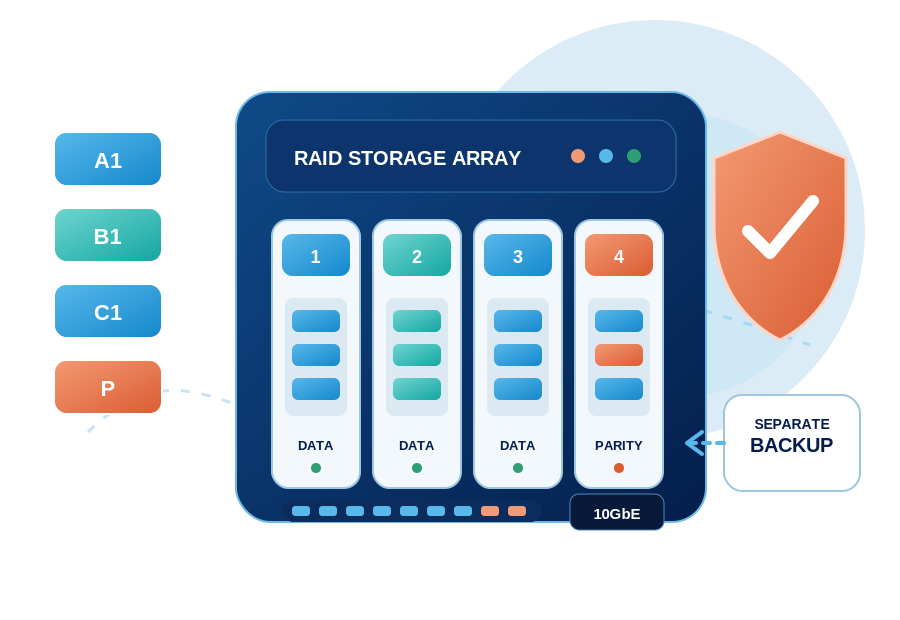
Illustration of a four-drive RAID storage array with data, parity and a separate backup
Quick answer

RAID combines multiple drives into one storage arrangement

RAID commonly means Redundant Array of Independent Disks. Depending on the selected level, it can split data across drives for performance, duplicate data for drive-failure tolerance, or store parity information that can help reconstruct data after a supported drive failure.

The trade-off is that protection consumes part of the raw capacity. The right choice depends on drive count, usable capacity, acceptable failure tolerance, workload, recovery plan and the RAID levels supported by the exact NAS.
A1 A2

Striping

Blocks are distributed across multiple drives. This can increase throughput and use more raw capacity, but striping by itself provides no drive-failure protection.

A1 = A1

Mirroring

The same data is written to paired drives. A two-drive mirror keeps one full copy on each drive and provides about one drive of usable capacity.

P / Q

Parity

Recovery information is distributed with the data. RAID 5 uses one drive-equivalent for parity; RAID 6 uses two drive-equivalents.

Interactive planning tool

RAID usable-capacity calculator

Select the number of equal-capacity drives, the size of each drive and a RAID level. The result is an estimate for conventional matched-drive arrays—not a model-specific compatibility guarantee.

Build an example array

Results update automatically. Exact supported drive counts, reserved space, expansion and RAID behaviour depend on the NAS.

Choose 2–24 drives for planning. Model limits vary.
Use the capacity printed on one matched drive.
Valid example: 4 × 8 TB in RAID 5.
Raw capacity32 TBBefore RAID overhead
Estimated usable24 TBAbout 21.83 TiB
RAID overhead8 TB75% raw-capacity efficiency
Drive failures1 driveBefore the array loses tolerance
Minimum drives3Common minimum for this level
Selected layoutRAID 5Distributed single parity

Formula: (4 − 1) × 8 TB = 24 TB usable.

How the selected drives are usedConceptual display; parity is distributed in RAID 5 and RAID 6
 

Capacity note: the estimate assumes equal-capacity drives. With conventional mixed-size RAID, each member is normally limited to the smallest drive. Actual available space is lower after decimal-to-binary display differences, partitions, the file system, metadata, system reserves, snapshots and other configured services.

Drive set RAID Raw capacity Estimated usable Typical drive-failure tolerance Planning note
2 × 8 TB RAID 1 16 TB 8 TB 1 drive Two-drive mirror; about half of raw capacity is usable.
4 × 8 TB RAID 5 32 TB 24 TB 1 drive One drive-equivalent is used for distributed parity.
4 × 8 TB RAID 6 32 TB 16 TB 2 drives Two drive-equivalents are used for parity.
4 × 8 TB RAID 10 32 TB 16 TB 1 per mirror pair Survival of multiple failures depends on which paired drives fail.
6 × 12 TB RAID 5 72 TB 60 TB 1 drive Higher efficiency than the four-drive example, with one-failure tolerance.
6 × 12 TB RAID 6 72 TB 48 TB 2 drives Additional parity capacity for two-failure tolerance.
6 × 12 TB RAID 10 72 TB 36 TB 1 per mirror pair Three mirrored pairs striped together; about half of raw capacity is usable.
Compare the common levels

How RAID 0, 1, 5, 6 and 10 work

Each level changes the balance between usable capacity, performance, minimum drive count and the number or pattern of drive failures the array can tolerate.

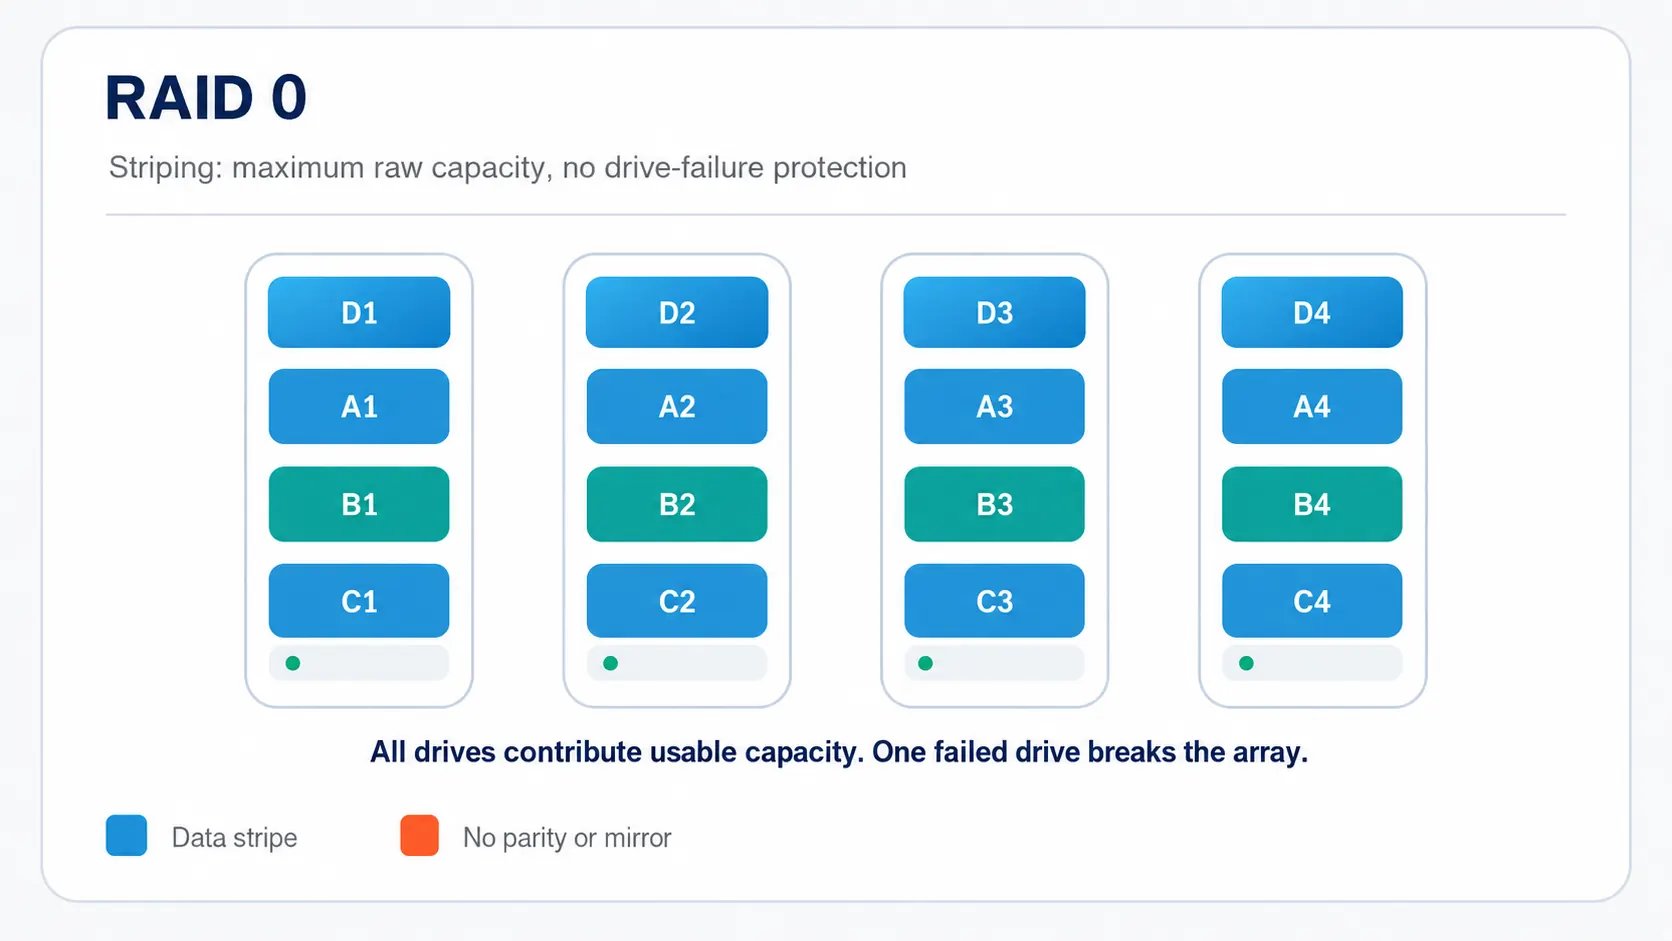
RAID 0 diagram showing data striped across four drives with no parity or mirror

RAID 0: striping without redundancy

Data blocks are spread across two or more drives. All matched raw capacity is available and sequential performance can improve, but a failure of any member drive can make the complete array unavailable.

Minimum 2 drives0-drive tolerance100% raw capacity
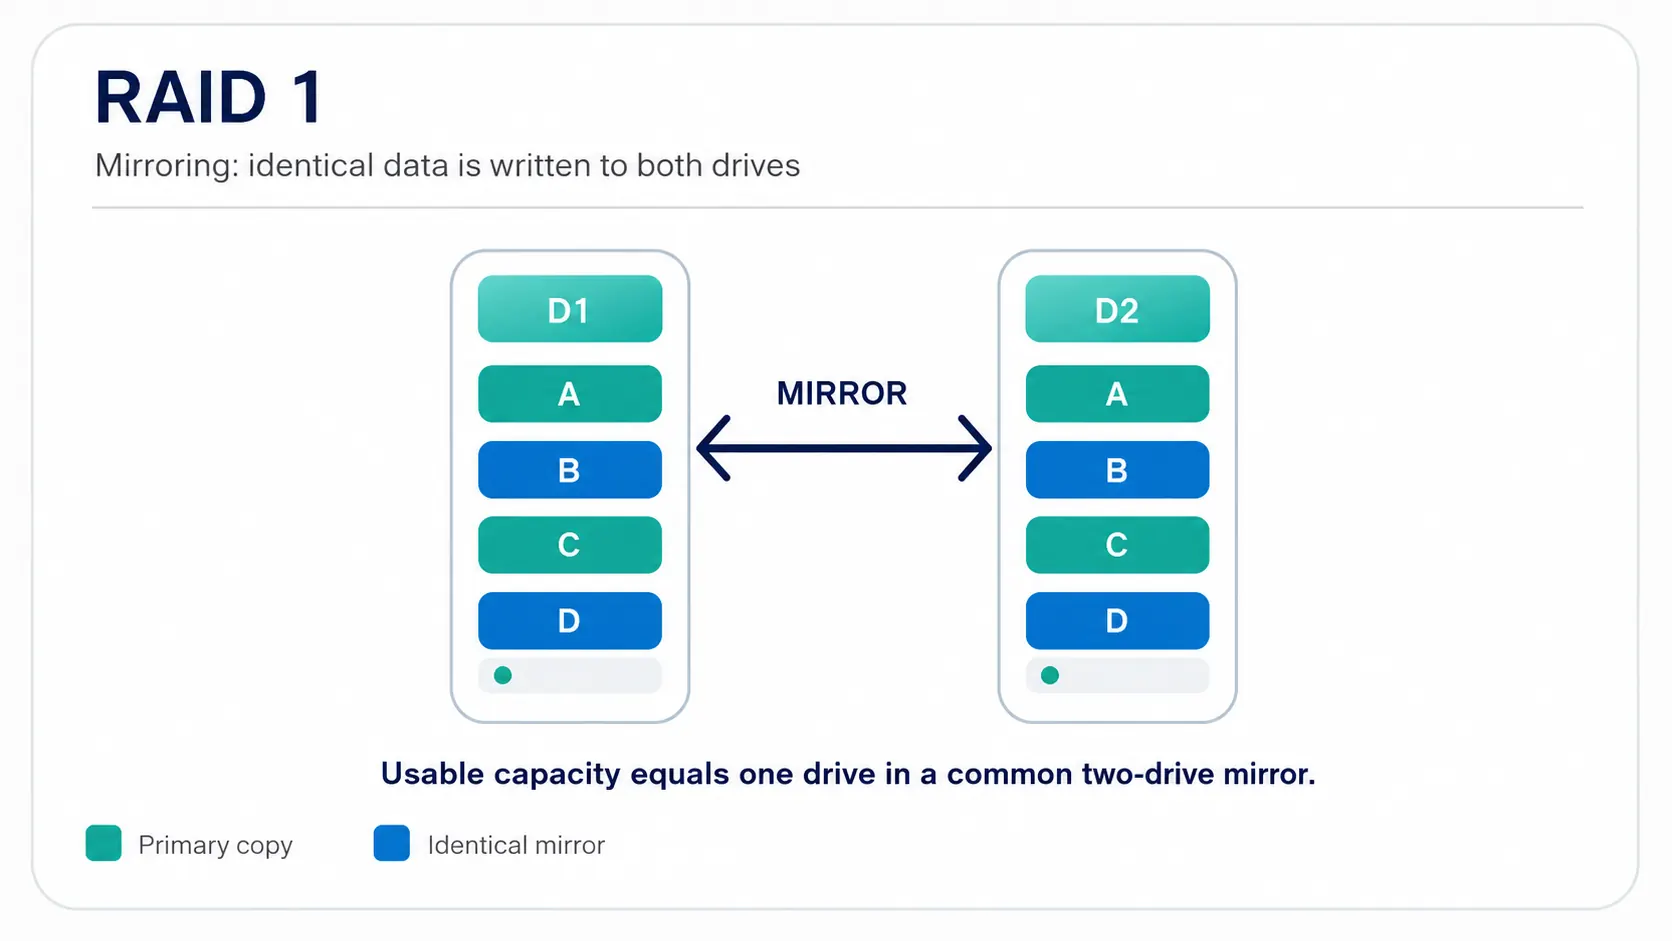
RAID 1 diagram showing identical data mirrored between two drives

RAID 1: a two-drive mirror

The same data is stored on both drives. A common two-drive mirror can continue after one drive fails, while usable capacity is approximately the capacity of one matched drive.

2 drives1-drive toleranceAbout 50% usable
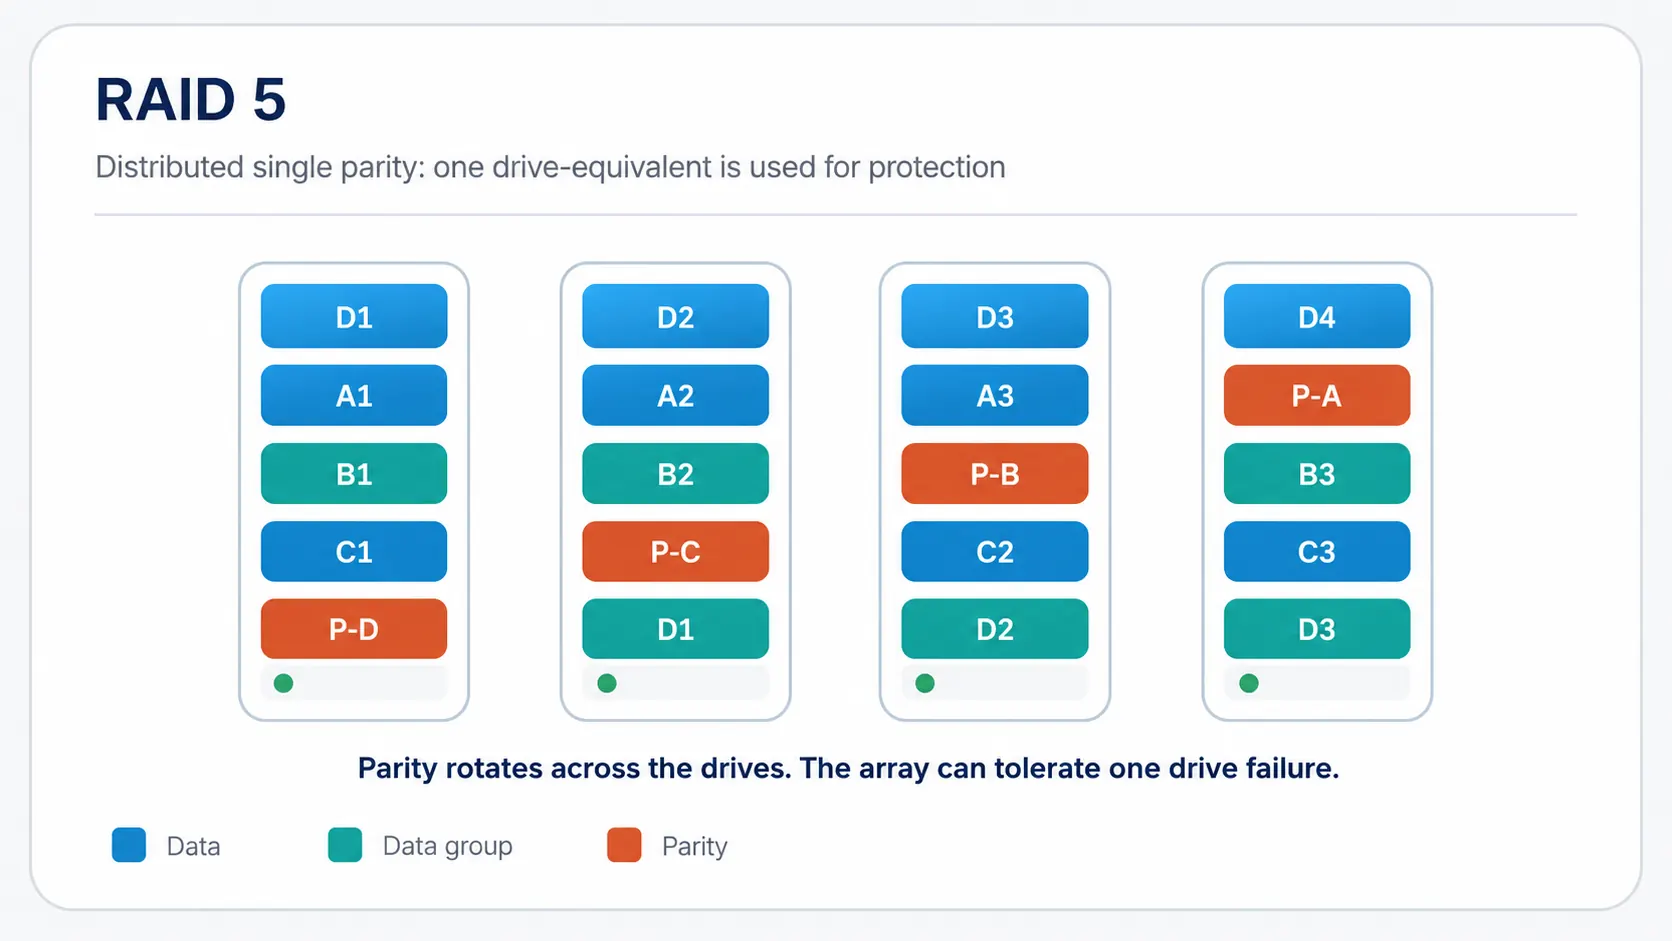
RAID 5 diagram showing data and single parity distributed across four drives

RAID 5: distributed single parity

Data and parity are striped across at least three drives. One drive-equivalent is used for parity, and the array normally continues after one drive fails. A second failure before recovery can cause data loss.

Minimum 3 drives1-drive toleranceCapacity minus 1 drive
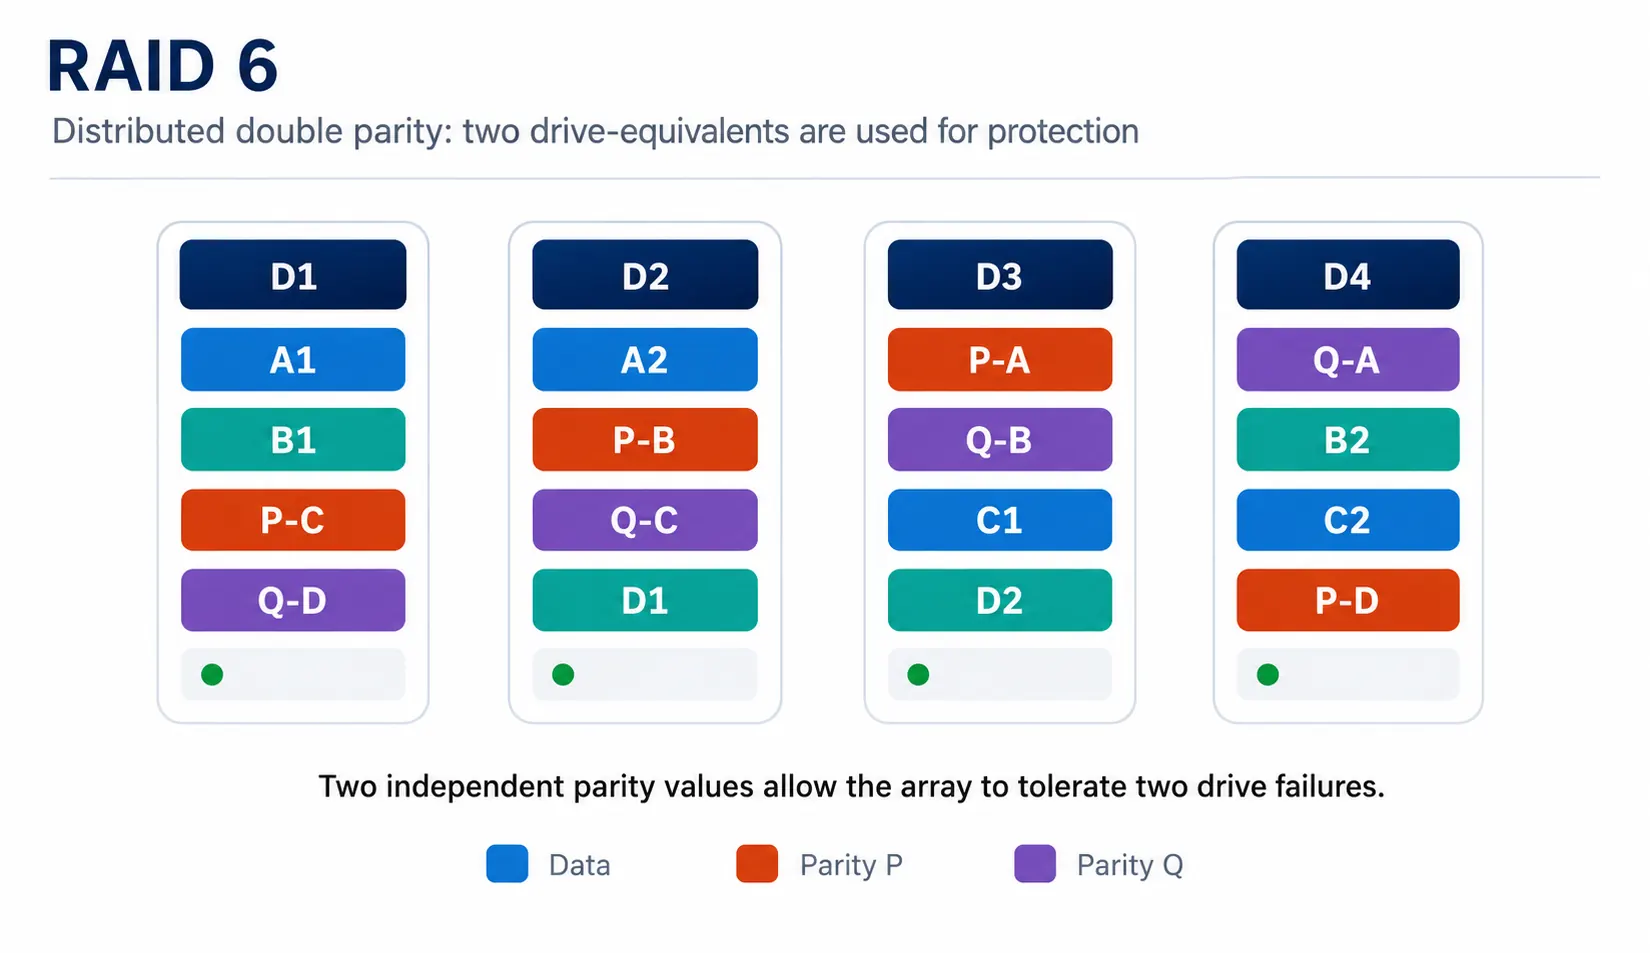
RAID 6 diagram showing data and two parity values distributed across four drives

RAID 6: distributed double parity

RAID 6 uses two independent parity values across at least four drives. It normally tolerates two drive failures, but two drive-equivalents are unavailable for user data and parity writes involve additional work.

Minimum 4 drives2-drive toleranceCapacity minus 2 drives
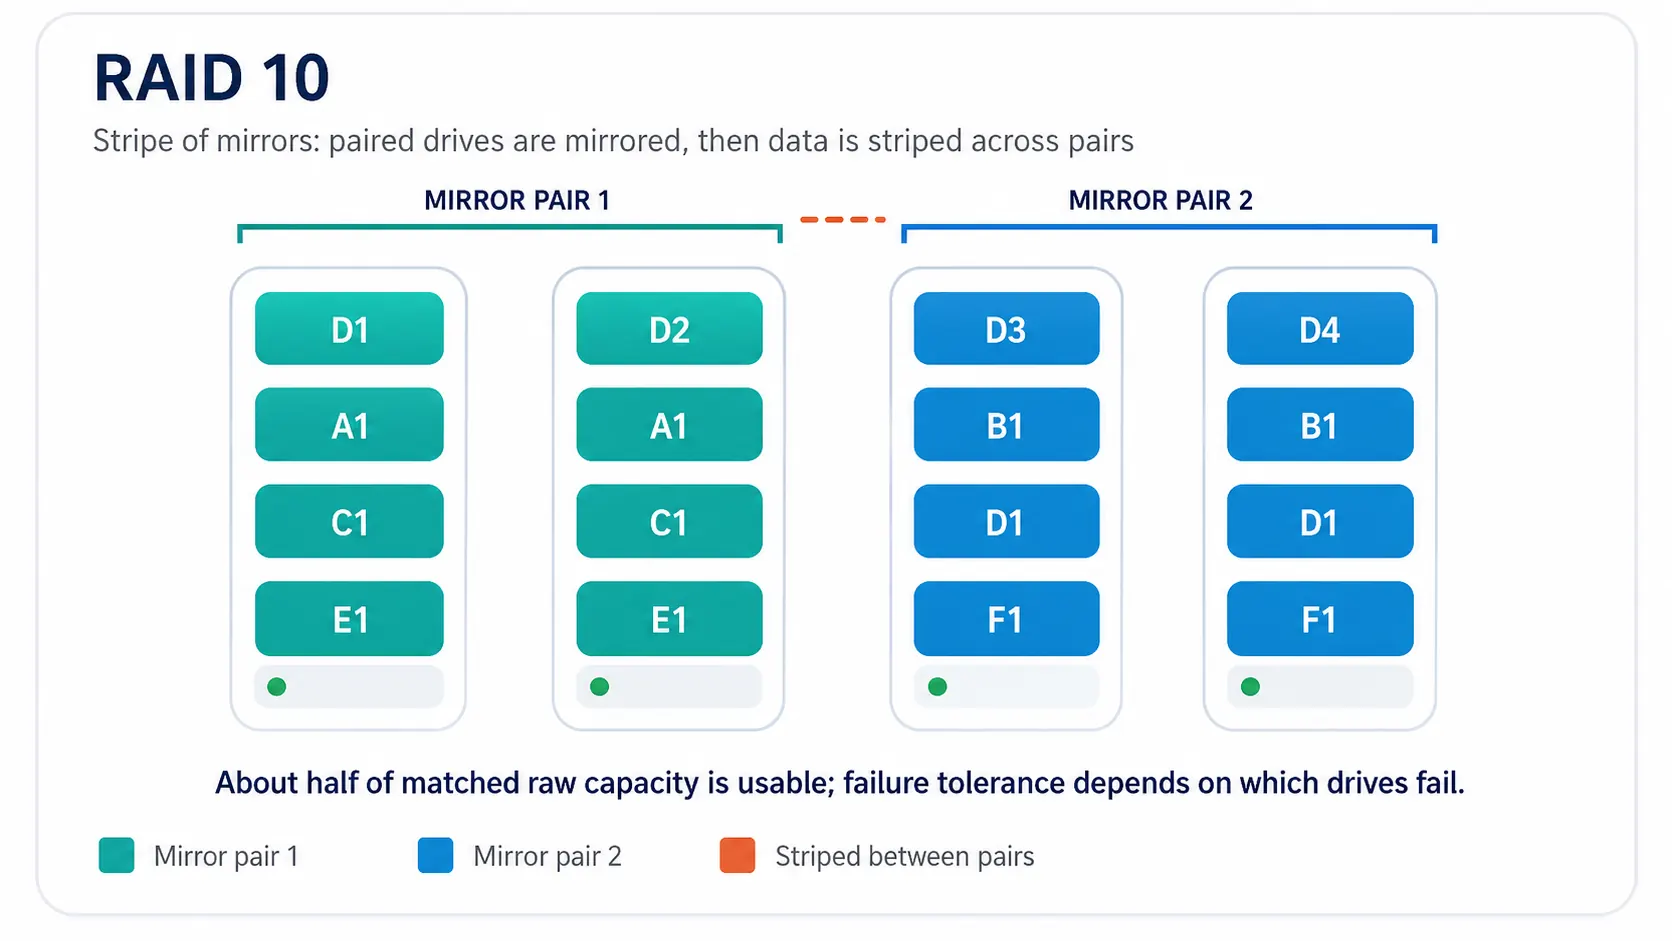
RAID 10 diagram showing two mirrored drive pairs striped together

RAID 10: striping across mirrored pairs

Drive pairs are mirrored, then data is striped across the pairs. RAID 10 requires an even number of at least four drives and uses about half of matched raw capacity. It can survive one failure in each mirror pair, but two failures in the same pair can fail the array.

Minimum 4, even count1 failure per pairAbout 50% usable
RAID level Common minimum Estimated usable capacity with matched drives Drive-failure tolerance Useful when planning for Main trade-off
RAID 0 2 drives Number of drives × smallest drive None Temporary or high-throughput data that is protected elsewhere Any member failure can make the array unavailable
RAID 1 2 drives One smallest drive in a two-drive mirror 1 drive Simple two-bay redundancy About half of matched raw capacity is usable
RAID 5 3 drives (Drives − 1) × smallest drive 1 drive A balance of capacity, read performance and one-failure tolerance No remaining tolerance while degraded after one failure
RAID 6 4 drives (Drives − 2) × smallest drive 2 drives Additional failure tolerance in larger or more important arrays More capacity and write work used for parity
RAID 10 4 drives, even count (Drives ÷ 2) × smallest drive 1 per mirror pair Random I/O, mirrored recovery behaviour and protected performance About half of matched raw capacity is usable
Match the level to the requirement

Which RAID level should you choose?

Start with the acceptable data-loss risk and recovery plan, then compare capacity, drive count, workload and the levels supported by the exact NAS.
2

Two drive bays

RAID 1 is commonly considered when a two-bay NAS needs to continue after either one drive fails. Plan for about one matched drive of usable capacity.

Typical comparison: RAID 1 versus non-protected RAID 0 or single-disk storage.
3+

Capacity balance

RAID 5 is often compared for supported arrays with at least three drives when one-drive tolerance and higher capacity efficiency are required.

Remember: after one failure, the degraded array has no remaining single-parity tolerance.
4+

Two-drive tolerance

RAID 6 is often considered when the array must normally withstand two drive failures and the extra parity capacity is acceptable.

Compare rebuild exposure, array size, workload and backup recovery objectives.
10

Mirrored performance

RAID 10 is often compared for protected random I/O and mirrored drive pairs. It requires an even drive count and provides about half of matched raw capacity.

Multiple failures are survivable only when they do not remove both drives in one mirror pair.

RAID 0 needs a clear reason: it provides capacity and striping performance but no drive-failure tolerance. Use it only when loss of the array is acceptable and the data exists in a separate recoverable location.

Advanced and vendor-specific options: some systems also offer Synology Hybrid RAID, SHR-2, RAID 50, RAID 60 or other layouts. Their capacity, minimum drives, expansion and migration behaviour depend on the platform and model, so verify the current manufacturer documentation rather than applying a generic formula.

Vendor-neutral workflow

How to set up RAID on a NAS safely

Menu names differ between QNAP, Synology, ASUSTOR, UGREEN and other platforms. Use this sequence to plan the work, then follow the exact setup wizard and warnings for the selected NAS.

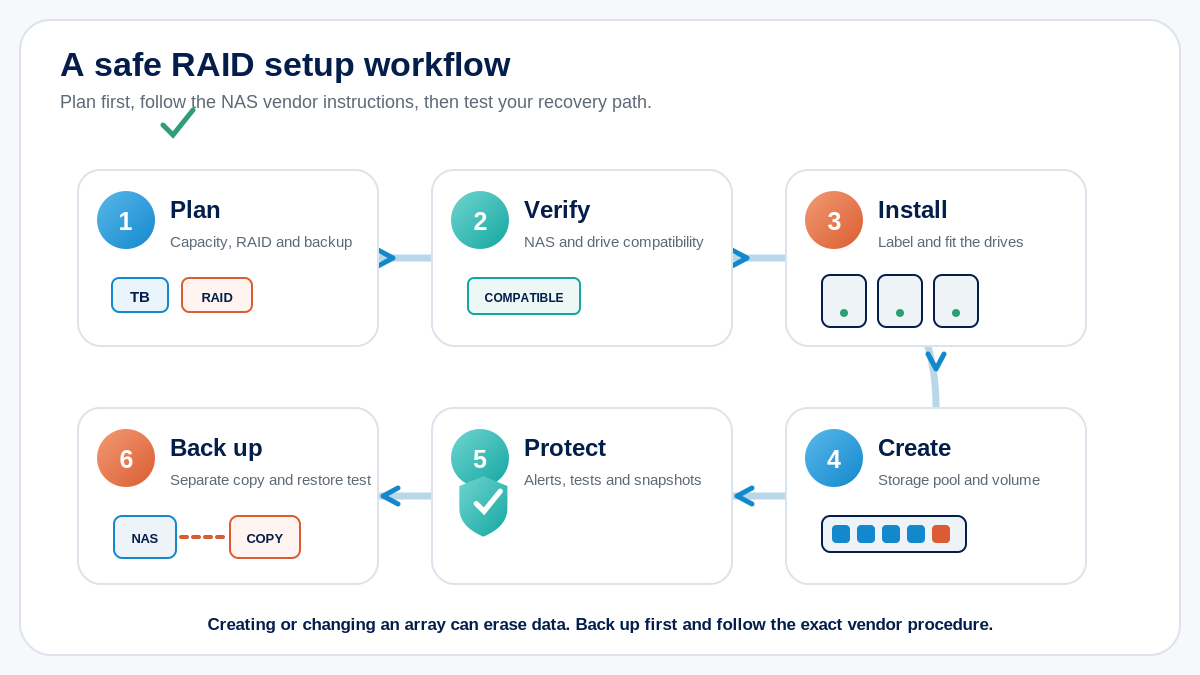
Six-step RAID setup workflow covering planning, compatibility, drive installation, array creation, protection and separate backup
1

Plan capacity, tolerance and backup

Measure current data, versions and growth. Use the calculator to estimate RAID overhead, keep operating headroom, and decide where the separate backup will live before data is moved.

2

Verify the NAS and drives

  • Confirm the model supports the required RAID level and drive count.
  • Check drive interface, form factor, capacity, firmware and manufacturer compatibility information.
  • Use matched compatible drives where practical and document each drive serial number and bay.
3

Back up and install the drives

Back up any data already stored on the selected drives. Follow the hardware guide for trays, screws, bay order, power state and anti-static handling. Do not assume every NAS supports hot installation.

4

Create the storage pool or RAID group

Open the NAS storage manager, select only the intended drives, choose the supported RAID level, review the estimated capacity and confirm any optional spare, encryption, snapshot reserve or alert threshold settings.

5

Create the volume and let initialisation finish

Review the final summary carefully before confirming. Create the required volume or shared storage space, then allow synchronisation, optimisation or initialisation to finish. Avoid power loss, shutdowns and unnecessary heavy work during this stage.

6

Protect, monitor and test recovery

  • Configure capacity, drive-health, backup and security alerts.
  • Schedule supported drive tests, RAID scrubbing, snapshots and updates as appropriate.
  • Create users and shared folders with minimum required access.
  • Run the separate backup and complete a real restore test.

Before clicking Create: RAID creation, migration, reinitialisation and some expansion actions can erase every selected drive. Confirm the bay numbers, drive identities and backup before accepting any destructive warning.

Degraded-array response

What to do when a RAID drive fails

Act carefully. A protected array may remain accessible, but degraded operation means reduced or no remaining failure tolerance and a rebuild places additional work on the surviving drives.

01

Confirm the alert and backup

Read the storage-manager event, confirm the array state and make sure important data has a current separate backup. Do not rely only on an LED or guess which bay failed.

02

Identify the exact drive

Record the failed bay, model and serial number in the management interface. Check whether the NAS supports hot swapping and whether the vendor requires the system to remain on or be shut down.

03

Use a supported replacement

Fit a compatible drive with capacity at least equal to the failed member, following the exact model procedure. Extra capacity on one larger drive may not become usable immediately.

04

Start and monitor the rebuild

Confirm the replacement is recognised and the array changes to rebuilding, repairing or synchronising. Keep the NAS powered and reduce avoidable workload if the vendor recommends it.

05

Do not remove another drive

Never pull a second drive because its light looks unusual. Removing the wrong member or another drive during rebuild can exceed the array's failure tolerance and cause data loss.

06

Verify after recovery

Wait for a Ready or Healthy state, review drive health and system logs, confirm shares and applications, run the appropriate checks, and verify that backups are still completing and restorable.

Do not promise a fixed rebuild time. Rebuild duration varies with drive size and health, errors, RAID type, NAS hardware, workload and background services. If the array reports multiple failed or missing drives, stop making changes and obtain model-specific technical assistance.

Before you build the array

Final RAID planning check

A reliable storage design includes compatible hardware, realistic usable capacity, monitoring, power protection and a recovery path—not only a RAID number.

  • Workload: file sharing, backup, media, surveillance, virtualisation or another supported application.
  • Capacity: current data, retained versions, snapshots, growth, RAID overhead and free operating space.
  • Failure tolerance: how many drive failures or which failure pattern the selected level can survive.
  • Compatibility: exact NAS model, bays, interface, drive list, firmware and supported RAID levels.
  • Performance path: drives, CPU, memory, network ports, switch, cabling and client adapters.
  • Monitoring: drive health, capacity, RAID, backup and security alerts sent to a responsible person.
  • Power: suitable surge or UPS planning where supported safe shutdown is required.
  • Recovery: separate backup destination, retention, offline or off-site copy and a tested restore procedure.
RAID questions answered

Frequently asked questions about RAID

Use these answers for general planning, then verify model-specific RAID, drive, expansion and replacement instructions before changing a live storage system.

What does RAID stand for?

RAID commonly stands for Redundant Array of Independent Disks. It combines multiple drives into one logical storage arrangement using striping, mirroring, parity or a combination of these methods.

Is RAID the same as a backup?

No. RAID can help a supported array remain available after certain drive failures, but it does not protect against accidental deletion, malware, file corruption, theft, fire or loss of the entire NAS. Keep at least one separate backup and test that it can be restored.

How do I calculate usable RAID capacity?

For matched drives, multiply the number of drives by the capacity of one drive to find raw capacity, then apply the RAID overhead. RAID 1 uses about one drive of usable capacity in a two-drive mirror; RAID 5 subtracts one drive; RAID 6 subtracts two drives; and RAID 10 uses about half of the matched raw capacity.

Why does a NAS show less capacity than the drive labels?

Drive manufacturers normally state decimal terabytes, while operating systems may display binary tebibytes or reserve space for partitions, the file system, metadata, snapshots and system functions. The calculator therefore shows both an estimated decimal TB figure and an approximate TiB figure.

What RAID level is commonly used in a two-bay NAS?

RAID 1 is commonly considered for a two-bay NAS because both drives hold matching copies and the array can normally continue after either one drive fails. Usable capacity is approximately the size of one matched drive.

What is the difference between RAID 1 and RAID 5?

RAID 1 mirrors data and is commonly used with two drives. RAID 5 stripes data and distributed parity across at least three drives, normally tolerates one drive failure and offers more usable capacity than a same-size two-drive mirror when additional drives are used.

What is the difference between RAID 5 and RAID 6?

RAID 5 uses one drive-equivalent for parity and normally tolerates one drive failure. RAID 6 uses two drive-equivalents for parity and normally tolerates two drive failures, but provides less usable capacity and additional parity work.

What is the difference between RAID 5 and RAID 10?

RAID 5 uses distributed parity and typically retains more usable capacity. RAID 10 mirrors drive pairs and stripes across those pairs, uses about half of the matched raw capacity and is often considered where random read and write performance and mirrored recovery behaviour are important.

How many drives are required for RAID 0, 1, 5, 6 and 10?

The common minimums are two drives for RAID 0, two drives for RAID 1, three drives for RAID 5, four drives for RAID 6, and four drives in an even count for RAID 10. The exact levels and maximum drive counts depend on the NAS model and operating system.

What happens when drives of different capacities are used in one RAID group?

In conventional RAID groups with failure tolerance, capacity is normally calculated using the smallest member drive. The extra capacity on larger drives may remain unavailable. For predictable capacity and performance, verify the vendor guidance and use compatible matched drives where practical.

Can HDDs and SSDs be mixed in the same RAID group?

Some systems may permit certain mixed arrangements, but support, performance and endurance behaviour vary. Do not assume that drives which physically fit can be combined. Check the exact NAS model, storage interface, operating-system rules and manufacturer compatibility information.

Can I add more drives to a RAID array later?

Possibly. Online expansion, adding drives and adding a new RAID group depend on the NAS model, operating system, current RAID type, available bays and storage-pool design. Confirm the supported expansion path before buying or creating the array.

Can I change the RAID level later?

Some NAS platforms support selected RAID migrations, but not every conversion is available and the process may require spare bays, additional drives, a rebuild or complete recreation. Keep a verified backup and follow the exact manufacturer procedure.

Does RAID protect against ransomware or accidental deletion?

No. RAID usually reproduces a deletion, encryption event or corrupted file across the array. Use separate backups, version history and snapshots where supported, with at least one copy isolated from the main NAS.

What happens when a drive fails in a protected RAID array?

The array normally enters a degraded or warning state and has reduced or no remaining failure tolerance. Confirm the failed bay and drive identity in the management interface, check the backup, follow the vendor replacement procedure and allow the rebuild to finish before removing another drive.

Can I replace a failed drive while the NAS is running?

Only when the exact NAS, drive bays and storage configuration support hot swapping and the manufacturer procedure permits it. Confirm the failed disk in the management interface before removal. When in doubt, follow the model-specific shutdown and replacement instructions.

What is a RAID hot spare?

A hot spare is an installed compatible drive reserved to replace a failed member automatically when the NAS and RAID configuration support that function. It can reduce the time before rebuilding starts, but it does not replace a separate backup.

How long does a RAID rebuild take?

There is no universal rebuild time. It depends on drive capacity and health, RAID type, NAS performance, interface speed, workload, background tasks and any read errors. Treat a rebuilding array as vulnerable and avoid unnecessary load or drive removal.

Does RAID improve performance?

It can, but the result depends on the RAID level, drive type, controller, workload, NAS hardware and network path. RAID 0 and striped RAID levels can increase throughput, while parity calculations and degraded operation can reduce write performance.

What are SHR, SHR-2, RAID 50 and RAID 60?

They are platform-specific or advanced storage layouts. Synology Hybrid RAID options and multi-group RAID 50 or RAID 60 can change capacity, expansion and failure-tolerance planning. Availability and behaviour depend on the exact NAS and operating system, so use the vendor documentation and calculator for the selected model.